Back
|
Back
|
| Project 17, Pulling Parlous Paul apart... The tale of a Paul Studios remodelled wartime aerial camera, return from the abyss. |
 |
The subject of this page is the rather obscure Paul Studios of Eastbourne 1950s conversion of a wartime aerial camera. An unknown number were produced to create what was essentially a cut price variant of the Agilux Agiflex camera. Since my own interests cover both aviation and photography, the camera is a source of fascination and was happily taken on. The camera started life as a military AGI (Aircraft &General Instruments) S/A (Small Aircraft) Mark II aerial camera likely during or just prior to WW2. Post war, it was disposed of as surplus, being bought by an enterprising company in Eastbourne, Paul Studio. It was then rebuilt as a cheaper alternative to the similar Agilux Agiflex. Paul Studio built an unknown number, but it's unlikely to be more than a couple of hundred. Shown here as donated in 2025, this camera had been displayed in the condition it arrived, alongside a close relative, an Agilux Agiflex. It had been given a cursory check on arrival which showed it to be in a poor way mechanically. In May 2026 the workshop was sufficiently motivated to see what might be done. |

|
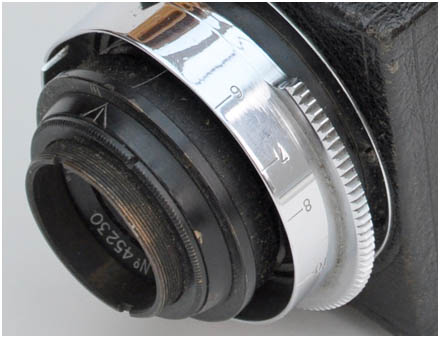
Firstly, the lens was whipped off, the focus was stiff to the point of seizure, aperture pretty much fixed and the glass filthy. If the lens can't be saved, then there's little point spending a bunch of time on the camera. This shows the lens assembly after completion. At this stage I hadn't decided to do a Project page for the camera so the lens overhaul wasn't documented unfortunately. The only tricky job was the two posts that protrude from the aperture ring, required as the ring nests deeply when focussed at infinity, making it awkward to adjust. Both snapped off in the past, leaving their broken ends corroded into the ring. As they were badly positioned when made, being too close to the edge, the old holes were filled and new holes drilled just below each, then tapped, new posts were made up and threaded to match, then fitted. The only problems left unresolved were some balsam degradation in the cemented rear group. Generally though the glass was quite clear and not disastrously scratched. With that out of the way, the camera was given a chance. |
|
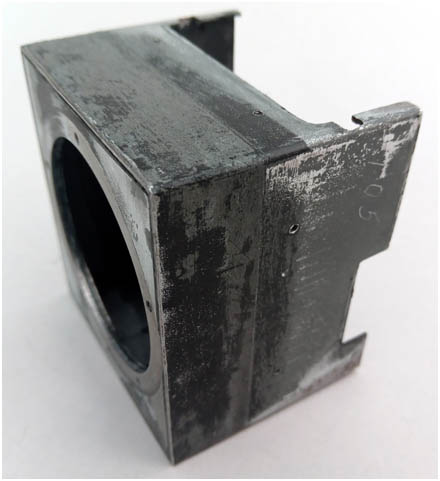
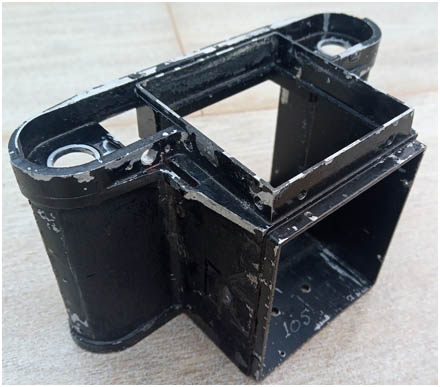
This assembly is the extended lens mount. As built the main shell is designed to take an 85mm focal length lens. For the aerial use AGI had intended for this camera a 4.2" (105mm) Hall brothers "Unimar" lens was fitted, requiring this extension. Traces of admiralty grey and matt black are evident from it's previous identity as an AGI S/A Mark II, aerial camera. Before this component can be removed, the hood, focus screen and focus adjusting grub screws need to be removed in order to get the lens mount out. When the Paul Studios conversion was undertaken, four adjustment screws were added under the focus screen, the two front ones protrude deep enough to interfere with the lens mount, requiring two slots to be cut into it, visible in the top flange in the picture. The mount will remain captive until these screws are removed. The number "105" is scratched into the grey paint, the 105th Paul Studio conversion? Or a reference to the 105mm extension itself? Technically, 4.2" is actually 106.68mm, but 105mm was a common focal length used at the time, particularly for then very common 6x9cm format. If I ever get my sticky little mits on another one, I'll whip it apart just to find out. |
|
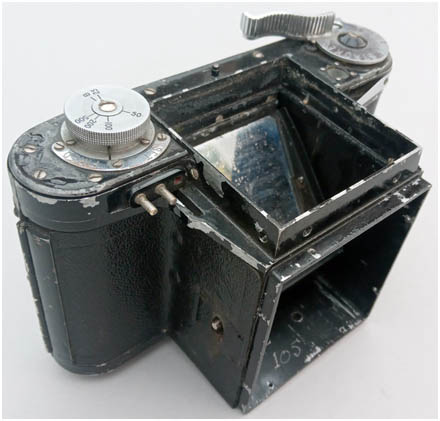
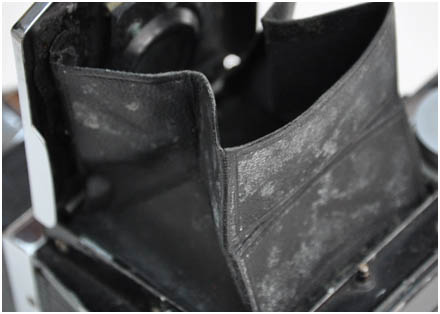
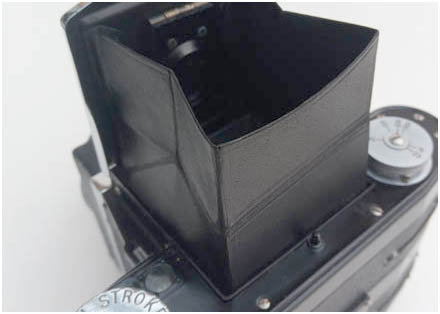
Visible in the bottom inside is the corresponding number "105". With the lens mount extension removed, we are left with what is essentially an Agiflex camera, as they were made by a subsidiary of AGI post war using the same tooling as the wartime production. At this point and from this view you'd be forgiven for thinking this is just a bit tatty, a bit of spit and polish and it's good to go, eh? There is no easy way to clean the mirror generally as the leather hood is partly cemented in place and access would logically be by removing the lens and extension mount... but guess what, you have to remove the hood and focus screen to get the mount out, disturbing the focus adjusting screws in the process. This has to be seen as major shortcoming of this conversion. Unsurprisingly, the mirror was absolutely filthy as no one had attempted to clean it for a very very long time, possibly not since Paul Studios closed it up seventy odd years ago. Turning it around revealed a distinct lack of shutter curtains, not a good sign, but not entirely surprising either, time to whip off the focal plane plate and see what we can see... |
|
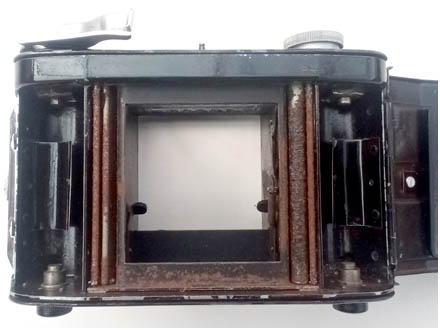
Oh my. This is definitely not what you want to find. At some point this camera has got very wet. The soggy curtains have sat against the unprotected mild steel components which then rusted in response. Whether the camera was still in use at the time, we'll never know, but the curtains became firmly attached to the supply side roller as it was apparently cocked when it rusted. |

|
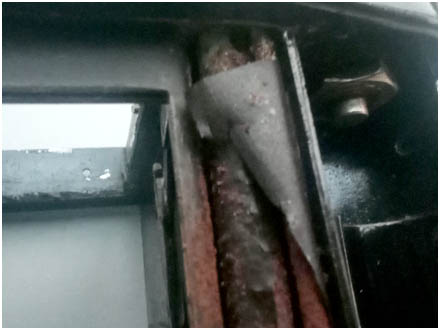
Wartime production meant that the curtains were noticeably lower quality, with the weave being visible on both sides, the light proofing being very thin. During the intervening decades the material broke down to a crisp, retaining no flexibility at all. Even at this point it's apparent that there will be insufficient material remaining to make patterns, new curtains will have to be made by prototyping. Fortunately we've made new curtains for both Reflex Korelle and Agiflex cameras, and much of that experience will translate straight across. Here is the supply side, first curtain spool with the remains of the anchor strip, but no evidence of the tapes. Actually Korelle type curtains don't use tapes, it's a continuous run of shutter cloth with a hole cut out. The thinner rusty roller is the one that guides the second curtain around the first. The remains of the second curtain are still partly wrapped around it near the top.
|
|
All that remains of the second curtain where it emerges from the supply side. Also visible is the nut at the top of the film spool chamber, one each side, these hold the shutter crate in position, undoing this and its compatriot in the take up spool chamber enable the entire shutter mechanism to lift out neatly as a working sub assembly. Out of shot is the nut attempting to revive this monstrous pile of rot. |
|
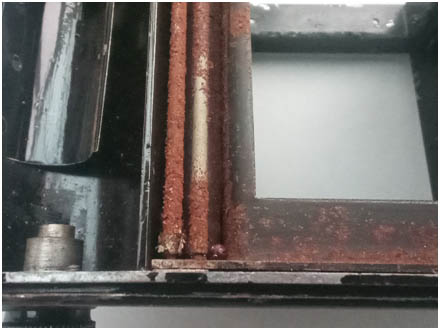
The two guide rollers on the spring spool side. The rust is progressively worse towards the bottom suggesting the camera was stored upright and wet for some time. The jury is out as whether or not we can save this one, it's possible the springs within the spring rollers have rusted to powder, in which case we have a paperweight on our hands. |

|
Although the shutter crate can be taken out with the top plate in situ, I prefer to go in from the top. As I go I take dozens of images with a mobile phone, sometimes seemingly identical screws will only go back in the hole they came out of. Cameras develop character over many decades and it's best to go along with them, as they get set in their ways. |
|
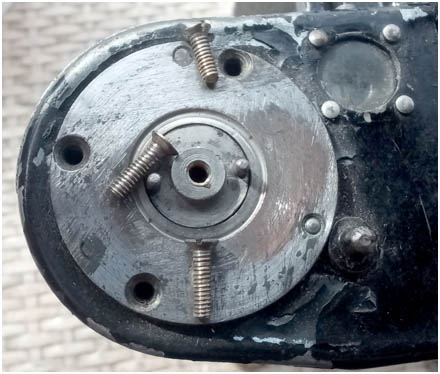
Three screws, two different lengths. Flaky paint. |

|
Under the top plate. The frame counter and advance pulley are evident, but the cocking cable is absent. It's been absent a very long time from the evidence. |

|
Ordinarily the shutter crate lifts out unhindered. Unless it's been modified for flash, in that case you need to remove the plug contacts and de-solder the wire from the insulating block, already done here. On this bulb synch' version, the outer most plug contact is actually threaded and needs to be unscrewed. The plug contact mount helpfully gets in the way of the screw that holds the hood in place too, so needs to be removed before the hood can be taken off too... chalk that one up as a additional pain in the posterior for mirror cleaning. |
|
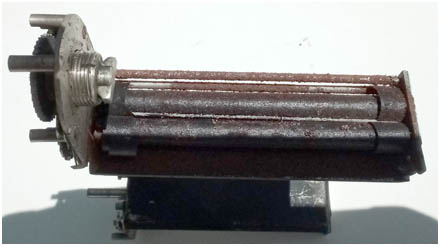
Now with the shutter crate out in the daylight we have this. This is bad. Really bad. No. It's a challenge. A really decent challenge for a life devoid of meaningful challenges. Phew, positive thinking classes paid off. The exact sequence of events we'll never know, but the first curtain snapped, likely as someone released the shutter, unrestrained the first curtain flew by it's normal stop position chased by the second curtain. Momentum and remaining tension pulled the stiffener strip over the guide roller where it jammed itself in between the second and first curtain spring rollers, causing the second curtain to stop near the end of its travel, as indicated by the second curtain tapes being still visible on their spring roller and wound three times. Had the second curtain snapped it's likely at least part of the full depth curtain would get round the corner. First curtains are the first to go though, as the thin tape section is under higher strain than the second curtain. |
|
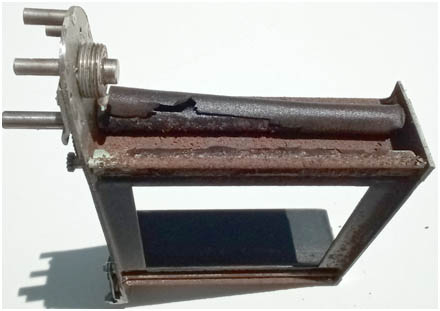
This event killed the camera altogether. At this point the camera was well used. The cable tensioning mechanism had snapped some time earlier and the owner resorted to cocking the shutter by rotating the speed selector, as evidenced by the chrome polished off the shutter status indicator from hundreds of cocking events. Evidence on the shutter gears also shows considerable wear from break out loads on the first curtain shutter under release. How the camera didn't just wind up in landfill is another mystery, but it survived this far so we really should try and save it. This image shows the shutter supply spool side. There is no sign of the locking screw in the outer sleeve. It was later found rusted to the bottom amidst all the powder and decay. Had the screw come out when the camera was intact this would allow the first curtain to be drawn over to the fired side, but would remain there. When cocking the camera the spool core would spin, but the sleeve would not, so the curtain would remain on the fired side. Entirely fixable at the time, this suggests that the screw coming out is post curtain snapping. |

|
When AGI made the crate, they nickle plated the top plates, matt painted the visible unprotected steel areas, and unhelpfully left the rest as bare metal. Given that this was originally intended for the admiralty and likely to experience some salty sea air, this does seem a bit of corner cutting too far. Wartime production? |

|
Wind on side, progressive pictures as we dig in. Note direction of teeth, they won't work upside down. |

|
The lever at the bottom is required to both engage and disengage the advance lock. From frame four onwards the camera automatically locks as the film is advanced. If the cable tensioning is working (it's a sizable "if"), the first full stroke cocks the shutter, subsequent nudges pull the film around until the number on the backing paper reads out through the red window, or the number guide in the top window reads the next frame, for the first three frames. You choose. |

|
These images record where the various springs are routed. It's all rather grubby, but nothing to worry about here. |

|
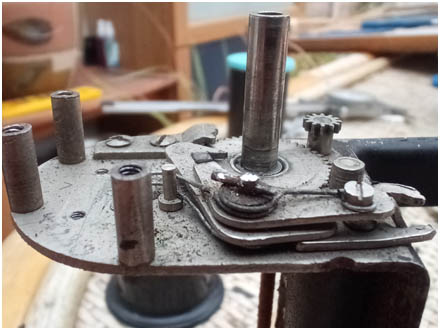
On the shutter setting side, with the first curtain gear and flash synch' removed already. Someone has written "45230" on the end plate. It's faded and is either contemporary with manufacture or conversion. It corresponds to the serial number of the Hall Brothers Unimar lens fitted to this camera, confirming that this lens and body have always been together. Again, filthy but the remaining grease has done its job. |
|
Same side different angle. The main post is in decent condition. |

|
The faded serial close up. |
|
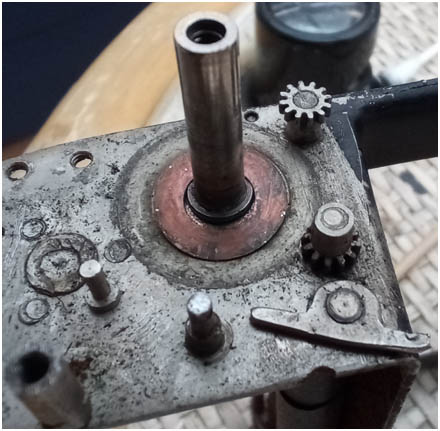
There is a copper washer beneath the second curtain wheel, needs a good polish. Interestingly the rocking lever at bottom right is rather better made than the later Agiflex camera seen in Project 9. |

|
The completely stripped shutter crate, now the cleaning and de rusting can begin. |

|
Et Voila! Boy, I love my Dremmel and a brass brush. Every sub assembly is dismantled into old yoghurt pots. Vertical layers are stacked sequentially in pots and put into the cleaning queue. As each pot is completed it moves to a quarantine area to be stored until ready for assembly. This keeps each screw, spring or whatever together. Cleaning for this involves a Cillit Bang bath followed by a distilled water clean, then a spray of WD40 to absorb the moisture, followed by an alcohol bath. Heavy rust is taken care of with the brass brush armed Dremmel. Working lubrication is applied during assembly. During cleaning the faded serial number was erased, so was etched back in afterwards. |

|
Test assembly to check tripping levers, pins and stops are all doing their thing. There are a few technician indicator marks, but these are useless now as the curtains no longer exist. |

|
The restored crate ready for curtains. I say "restored".... it has a considerable scarring. Don't we all. In an ideal world, all the components are clean, smoothly polished, the springs are completely identical and the whole motion is perfectly free from random drag. The mechanism requires two completely independent curtains to swish smoothly across the focal plane with identical acceleration characteristics. The design has a couple of issues in this regard, but the designers have cleverly sought to balance them out. The first curtain is shorter than the second, having less mass to accelerate and only needs to go round one tight 90° bend, but this is balanced out by it having to drive the shutter setting wheel. To a degree the spinning control wheel acts as a flywheel, smoothing out the progression of the first curtain. The second curtain is longer, has more mass and has to go round two tight 90° bends. In theory these competing factors balance out. The second curtain should swish across the focal plane in a constant smooth acceleration, falling slightly behind the first as the speed increases to allow the correct exposure as the gap passes in front of the film. The spools are far from even, deep pitting on the sleeves has given them variable diameter, the pivots are scored. The tight guide rollers are in a terrible state, but do at least spin freely. Maybe the rough surfaces will just give a bit of grip... Considerable rust dust was washed out of the spring rollers, so it's likely the coiled up internal springs don't quite have the cross sectional area they once had. After many washes they do at least function, sort of. I wonder how well they are anchored internally.
|
|
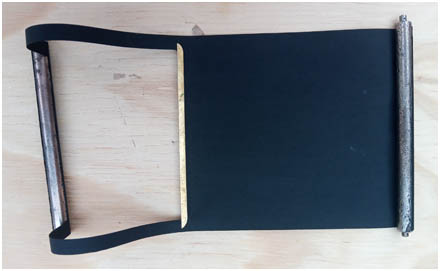
The curtains have to travel a fixed distance, over three and a bit rotations of the curtain spool. As the curtain comes off the spool the effective diameter decreases. This larger diameter at the beginning of travel is useful as it makes accelerating the curtain from a standstill a little easier. The first curtain should come to a halt just before the guide roller at the far end. Too far and it will angle up causing the second curtain to snag as it caps. There is a little leeway in the starting point, governed by small variations in the diameter of the spool, the thickness of the glue used to attach the curtain to the roller and the thickness of the curtain material. This is the third attempt at the first curtain, the final version used. The first two attempts were made with 0.225mm thick polyester based, but I couldn't get the travel right, eventually I had an anchor of just one third rotation, but felt this was too short. This is 0.200mm silk base with half rotation anchors and worked out nicely. Later Agiflex used steel edge stiffeners, but the surviving stiffener found jammed on the spring side was brass. The copper content was high and it had corroded beyond use, as it had gone brittle, so I made up new brass stiffeners. I painted them after this. |

|
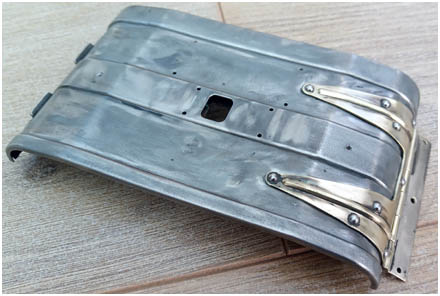
Both new curtains installed and tensioned up, capping nicely and travel distance well matched, shown here in the fired position with the metal stiffeners neatly superimposed (capped). Amazingly both curtains achieved a transit of 0.048 seconds. In actuality I think it's running a tad slow, but it seems to be one whole stop, so I can work round that. I don't want to put much strain on the spring rollers as I know they aren't in great shape. Short of locating spare spring rollers, this will have to do. You can see the condition of the narrow guide rollers, really pitted, but the pivots themselves aren't actually too bad, maybe just enough lubrication saved them. |
|
The rear hatch stripped of paint ready for priming. Visible above the location of the red widow hole are four redundant holes, usually hidden below the leather covering added during conversion. These are the holes that originally mounted the military data plate, including the serial number, confirming beyond all doubt that this is an ex S/A aerial camera. The data plate would have looked like this.
|
|
With the shutter apparently working, we can address the cosmetics. On balance I felt that much of the degradation was neglect rather than patina from use. Generally my policy is to conserve where appropriate, but neglect should be undone so far as possible. The gloss paint applied during the conversion from semi matt black had lost adhesion in many places, particularly the top plate and the shell was looking battered, so a total repaint was in order. The one piece aluminium casting made by AGI is competent and with some minor modifications would later be employed for the Agilux Agiflex. |

|
Stripped bare, there are a few minor voids and imperfections in the casting and some flow marks as the molten material cooled as it flowed through the die. Relatively little post processing machining seems to have been required. The slot to allow the shutter crate to drop in was closed out of the mould and had to be opened up by hand. Some milling around the shutter plate pintles and quite a few holes needed to be drilled and tapped, but otherwise it came out of the die ready to go. The finish is actually better than achieved on our later Agiflex, maybe the tooling was getting a bit tired after a few years of service. |

|
All the holes were plugged with cocktail sticks to prevent clogging the threads, a seemingly easy task, but it took a good while to complete. Mind you I did insist on cutting short lengths and sharpening them in a pencil sharpener to prevent using a whole tub of cocktails sticks. Way too useful to waste so needlessly. Here we see the shell in acid etch primer, just to make sure there are no adhesion issues later. Originally it was oven enamelled, although some parts did appear to have an admiralty grey primer, it wasn't universal. |

|
Matt black layer will be used both as an undercoat and finish internally. |

|
Gloss black applied over the matt where it's externally visible. The number "105" was put back in as was the pencilled number 6, faintly visible here. |

|
The first parts to go back in were the mirror tray, light dam and shutter tripping levers, as these weren't working on arrival, being bent out of shape and this would be the first chance to see if it all worked with the shutter crate in position. |

|
Initially all seemed well with the shutter firing with straightened tripping levers. After several releases the shutter started firing on random speeds. Here it's apparently indexed to 1/25th, but was actually firing on B. This turned out to be the centre bush pin, it had either worn over time or possibly been cut too short, or the hole for it drilled too deep and it got pushed into the bush so far it jumped out of the index slot. You can see the bush is standing slightly proud here due to riding high out of the slot hidden beneath. |

|
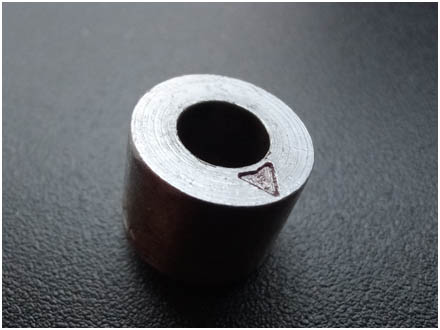
The solution was to make a cut through the bush taking out the pin with it. Then a slither of steel was soldered into the slot and filed to the correct size and depth, seen here. |
|
From above you'd never know, but the paint in the triangular index pointer needs doing. |
|
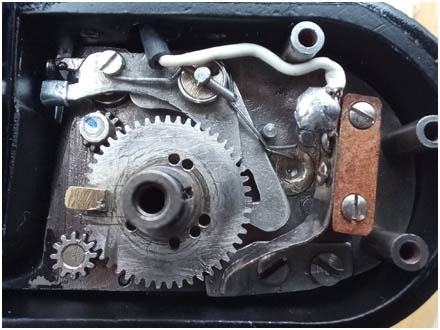
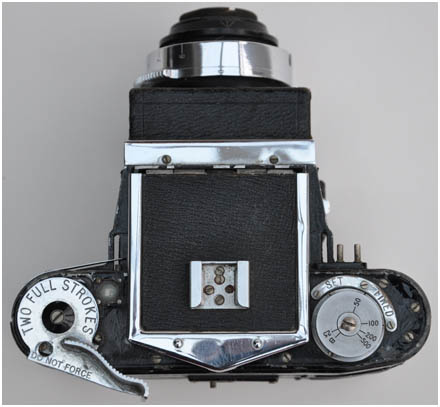
Closing up the camera. Here the shutter setting side has had the wire reconnected to the flash insulation block, one of the features added by Paul Studios during conversion. Also added was a small brass block, soldered to the top of the shutter's first curtain wheel, this completes the circuit as it passes the added flash contact. A new cotter pin was made to hold down the tripping levers as the existing one was looking rather mangled. Agiflex versions used a split pin. The cotter pin was originally soldered in place, I've used such a shallow taper I'm hoping friction alone will keep in it. I wonder if I'll have to review that decision in time... Although the flash technically functions, it's timed for flash bulbs so will never be used. The Paul Studio cameras were available in three versions, without flash contacts, bulb contacts only (as this example) or both bulb and electronic flash contacts. In the latter case three contacts are used and come out of the top plate in a triangular pattern. |
|
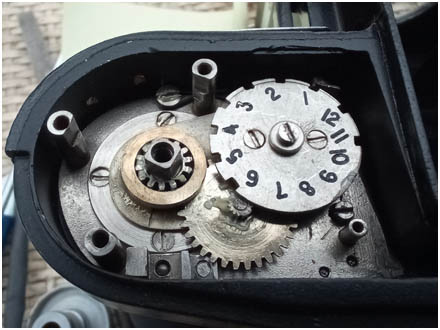
The shutter spring rollers are tensioned from the advance lever side, and the whole counter mechanism needs to come out to reach them, so the shutter has to be adjusted before building up this side. You also need to test with the lens mount extension fitted, as it has a felt mirror stop fitted and you need to check that the shutter still trips with this installed. We had to put a tiny bend into the lever to get the shutter to trip just as the mirror seats. Now close it all up. After the first test film was processed, revealing all was well with the camera, the cable tensioning system was recreated and installed. Several types of wire were tried before settling on some 0.4mm stainless steel wire rope. This is tricky to use as it needs to be soldered into the cocking pulley and stainless steel resists soldering, but we got there in the end. But it was thought worth going the extra distance to get the camera fully functioning as intended. |
|
 |
time for the before and afters... For all the effort, the change isn't as dramatic as I'd have thought. Most of the effort was expended on hidden parts of course. The original conversion's leather covering was treated, dyed and refitted. |
 |
 |
Not much to see here. The filter ring was deleted as it had a serious flat spot from a drop, but had saved the lens itself. The aperture ring posts have been recreated. |
 |
 |
Where exactly did those seventy hours go? The bent wind on lever is straight now and the red paint in the shutter index is back... really, is that it! What about the cocking cable.... er no sorry. Despite many a long search and several experimental goes, we have yet to find a cable that will work. One nearly went the distance but was too soft and stretched. So for now the approach used by countless Agiflex and Korelle owners before us will be adopted, give the shutter selector a 270° clockwise twist and the shutter is cocked. (No longer true, the cable was recreated in August 2026) Currently have some samples of stainless steel wire on order, so maybe in time. |
 |
 |
Okay, I can see where some of the workshop time has gone. |
 |
 |
Even this view is ordinarily denied you, as the shutter needs to be released on B to get it, this means the mirror is swung up out of the way revealing the rear of the lens not seen in the first image. In the first image the shutter curtain just didn't exist so no need. The museum entry can be viewed here.
|
 |
|
|
 |
||

|
||
© Living Image Vintage Camera Museum 2000-2026